HOLP Setup Guides
Step-by-step guides to help you get the most out of HOLP. From adding knowledge and customising your assistant to embedding it on your website, creating QR codes, and reviewing conversations, everything you need to get started is here.
Getting started & adding knowledge
HOLP already learns from your website, but the more knowledge you add, the smarter it becomes. In this guide, we’ll show you how to add FAQs, PDFs, and more so your assistant can give accurate answers every time.
Getting started with HOLP is quick and straightforward — and we’ve created a series of step-by-step guides to help you along the way. Whether you’re setting up HOLP for the first time or showing a teammate how it works, you’ll find everything you need here.
Each guide focuses on one part of the setup process, with clear instructions and screenshots so you can follow along easily. From creating your account, to adding knowledge, customising the assistant, embedding it on your website, and even sharing it with QR codes — you can work through them in order, or jump straight to the part you need.
By the end, you’ll have HOLP up and running, ready to answer customer questions and support your business 24/7.
Note: We recommend completing the setup on a desktop computer. While our brochure site works well on mobile, the dashboard is still being optimised for smaller screens.
Onboarding

Click “Start for Free”
From the HOLP website, click the green Start for Free button in the top-right corner (or in the hero section).

Enter Your Website ADDRESS
Add the link to your website. HOLP will use this to power the demo and show how it can answer questions based on your content. Include https://

Try the Demo
HOLP generates a demo assistant instantly. You can type in a few questions your visitors might ask and see how HOLP responds using your website content.

Save Your HOLP
To keep your new assistant, enter your name, email address, and a password. Click Save Your HOLP and you’ll be taken straight to your dashboard.

Confirmation & Next Steps
You’ll see a page confirming your HOLP assistant is ready to go 🎉.
Click Access Your Dashboard to continue.
💡 You’ll now be taken into your dashboard, where all setup and customisation happens. For the best experience, we recommend using a desktop — the dashboard isn’t fully optimised for mobile just yet.
Welcome to Your HOLP Dashboard
This is where you’ll manage everything about your assistant. From customising its look and tone, to adding more knowledge sources and grabbing the embed code for your website. Think of the dashboard as your control centre for HOLP.
Building your knowledge base
Right now, HOLP is already using the website link you gave during signup to answer questions. That means you could skip this step — but HOLP works best when it has more knowledge to draw from. The more you add, the smarter and more accurate your assistant becomes.
It’s a good idea to build up your knowledge base gradually by creating separate entries for different topics (like Opening Hours, Refund Policy, Delivery Times), instead of uploading one giant block of content. This makes it easier to:
Update or edit individual answers without affecting everything else
Keep information organised and searchable
Ensure HOLP responds quickly and accurately to specific questions
💡 Think of it like a library — it’s easier to find the right book on a shelf than to dig through one huge manual.
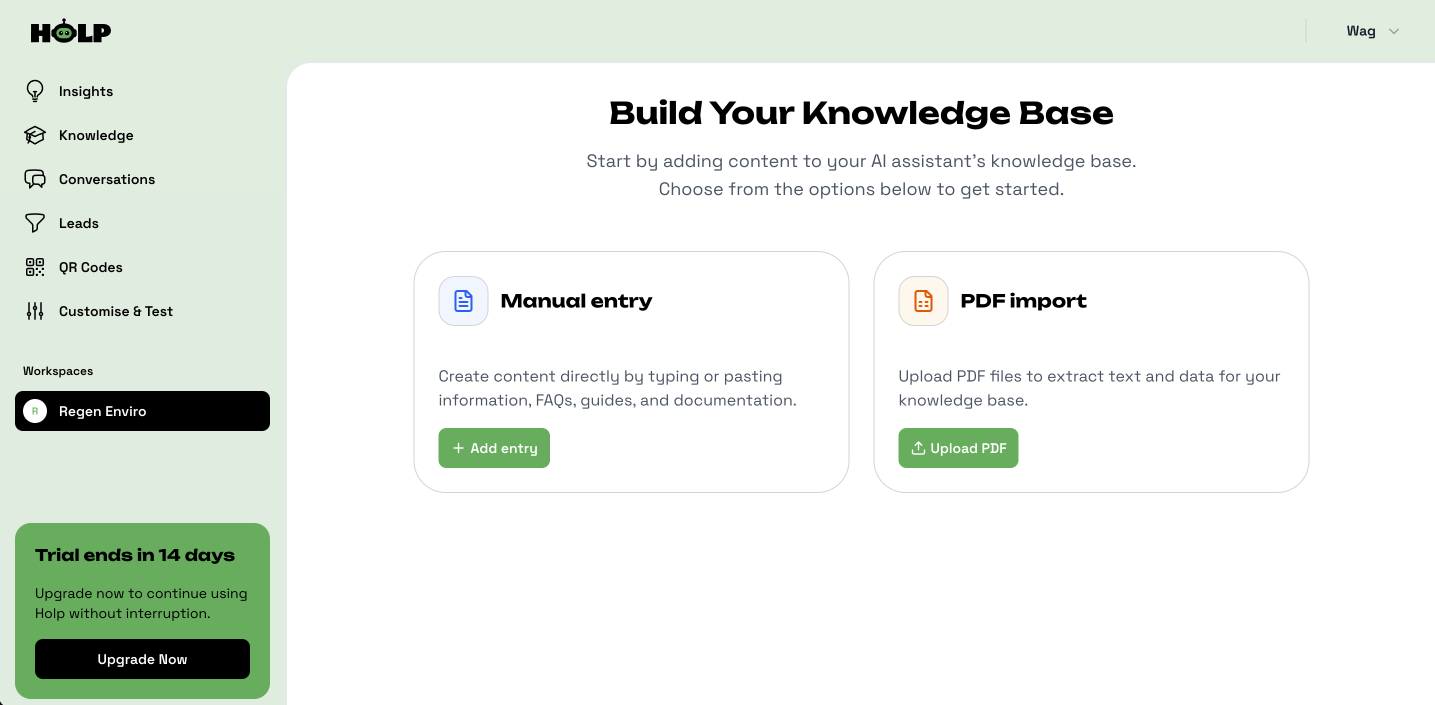
Step 1: Choose How to Add Knowledge
When you first open the Knowledge section, you’ll see two options:
Manual entry — type or paste in FAQs, policies, or guides.
PDF import — upload documents like manuals, brochures, or reports.
Both methods feed HOLP with the information it needs to answer questions.
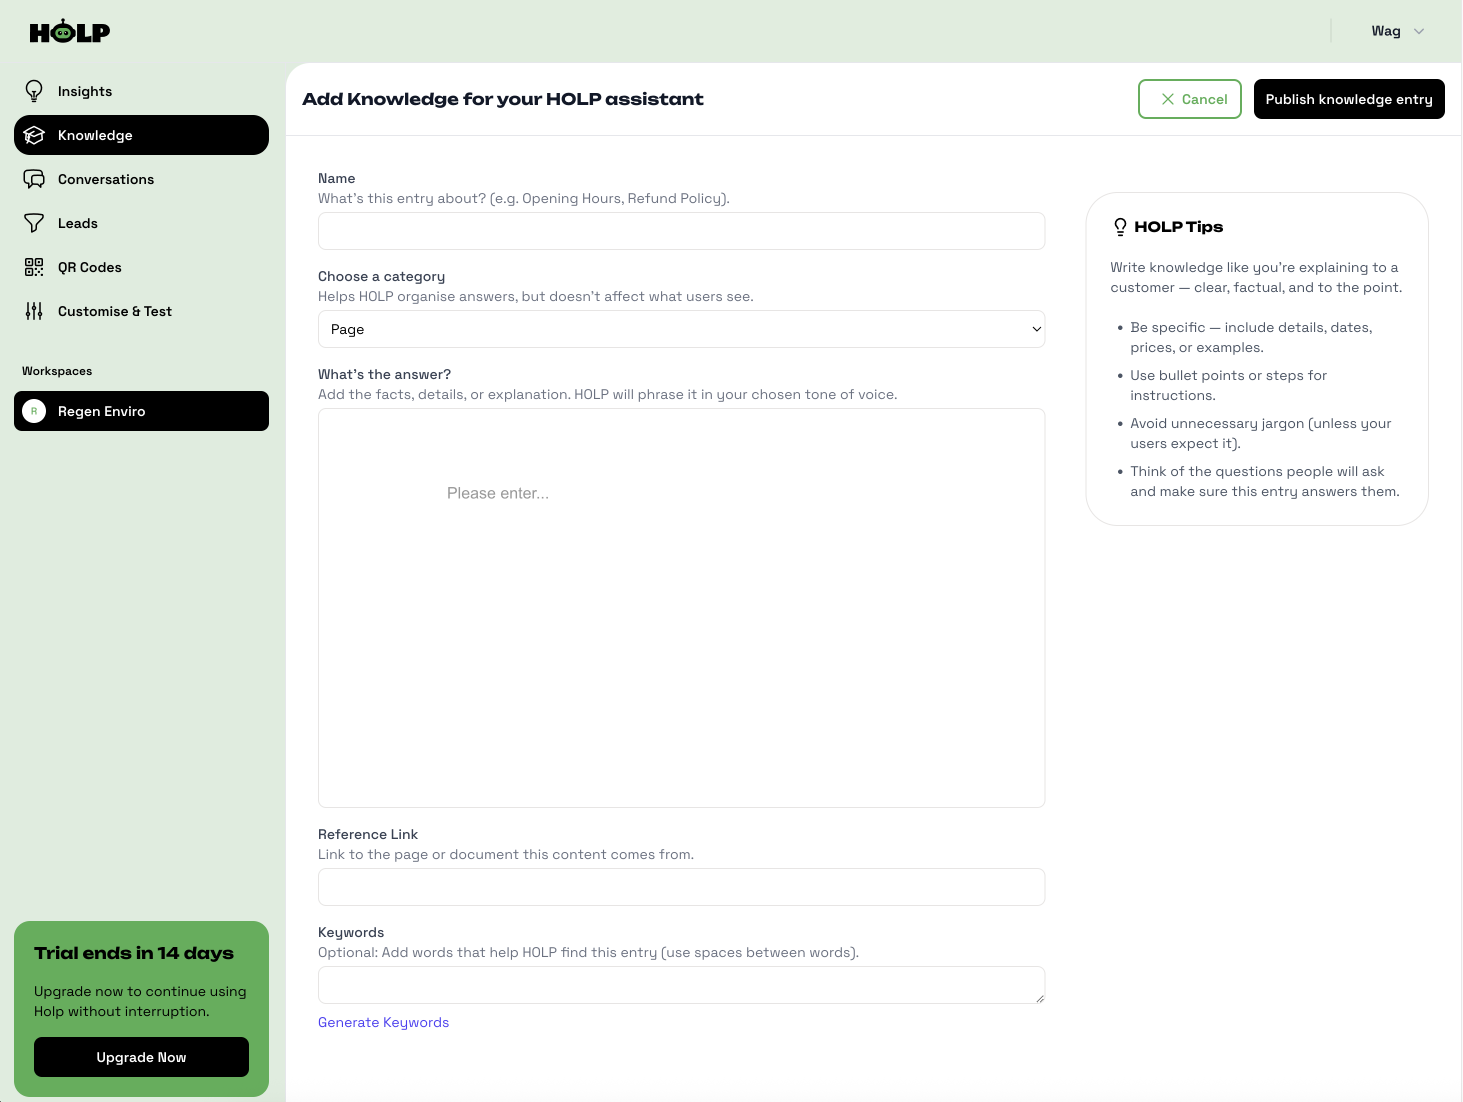
Step 2: Add Knowledge Manually
If you choose Manual entry, you’ll land on a simple form. Here you can:
Give your entry a name (e.g. Opening Hours).
Pick a category (for organising, not visible to customers).
Add the answer (facts, details, or explanations).
Optionally add a reference link and keywords.
💡 Tip: On the right-hand side you’ll see HOLP Tips — short, practical hints for writing clear, useful entries.
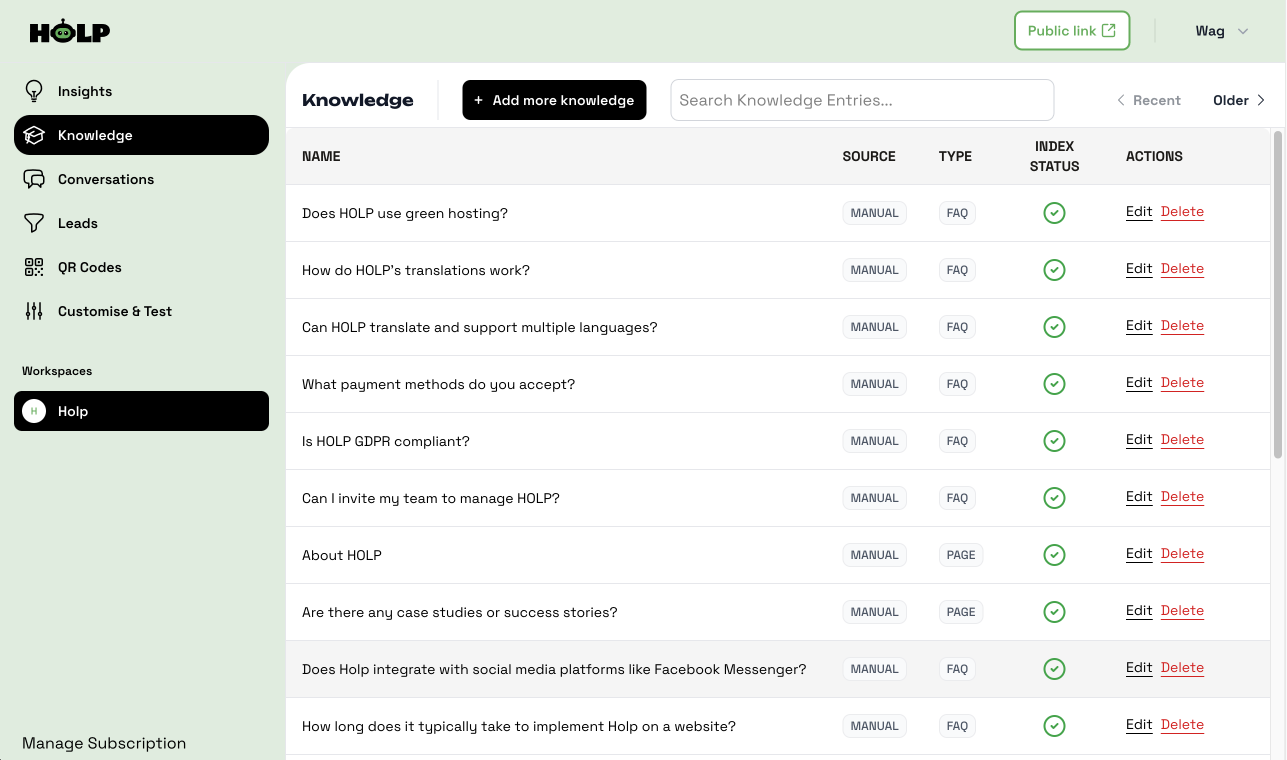
Step 3: View Your Knowledge List
Once saved, your new entry appears in the Knowledge list. If it’s your first, you’ll only see one entry here. Use the + Add more knowledge button to keep building. Over time, this page will grow into a library that HOLP can draw from.

Step 4: Upload a PDF
When you click Add more knowledge again, you can choose PDF import. A pop-up will appear letting you upload your file (up to 10MB). HOLP will scan the document and extract the text into your assistant’s knowledge base.
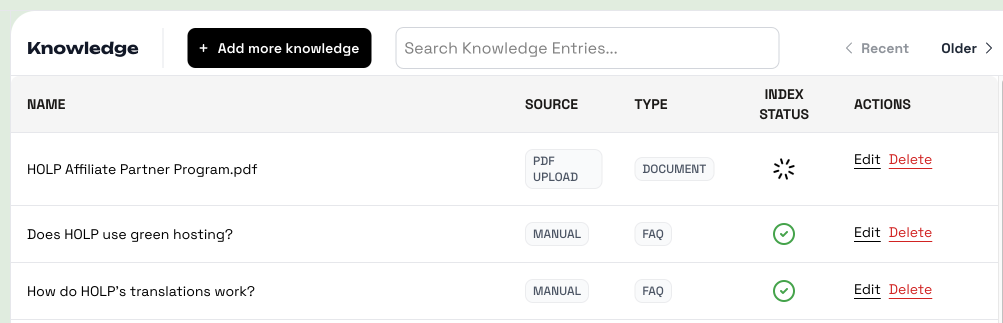
Step 5: Check the Upload
After uploading, you’ll return to the list page. You’ll see your PDF listed with a loading icon — this means HOLP is feeding on the content. Once it’s ready, you can click Edit to review or fine-tune the entry.
💡 Tip: Just like with manual entries, the right-hand panel will give you suggestions to make your content sharper and more helpful.
End of Knowledge Setup
That’s it! You’ve successfully added knowledge to your HOLP assistant. The more you add, the smarter and more accurate your assistant becomes.
At this point, you could actually start using HOLP straight away. Even without customisation, it already looks clean and professional. In fact, there’s a Public Link at the top of the dashboard you can share immediately with customers, or add to your social profiles.
But if you’d like to go further, the next steps will show you how to:
Customise HOLP’s identity, tone, and appearance
Embed HOLP directly onto your website
Create and share QR codes
Explore the Conversations area to see what customers are asking
Next: Customisation
Now that HOLP knows about your business, it’s time to give your assistant some personality. In the next section, we’ll walk through how to customise its name, tone of voice, and welcome message.
How to Customise Your HOLP Assistant
Give HOLP a personality that matches your brand. From choosing a name and tone of voice to adding your colours, logo, and starter questions, this guide shows you how to make HOLP feel like part of your team.
Customising your HOLP assistant is where you make it truly yours. Even without any changes, HOLP works and looks great out of the box, but by adjusting its name, tone, appearance, and welcome message, you can make it feel like a natural extension of your brand.
If you’ve just finished adding knowledge, this is the perfect next step. But if you’ve landed here directly, don’t worry, you can customise HOLP anytime, no matter how much (or how little) knowledge you’ve already added.
In this guide, we’ll walk you through each part of the Customisation page, show how the preview panel updates with your changes, and explain how to share your assistant publicly or add it to your site.
Note: We recommend completing the setup on a desktop computer. While our brochure site works well on mobile, the dashboard is still being optimised for smaller screens.
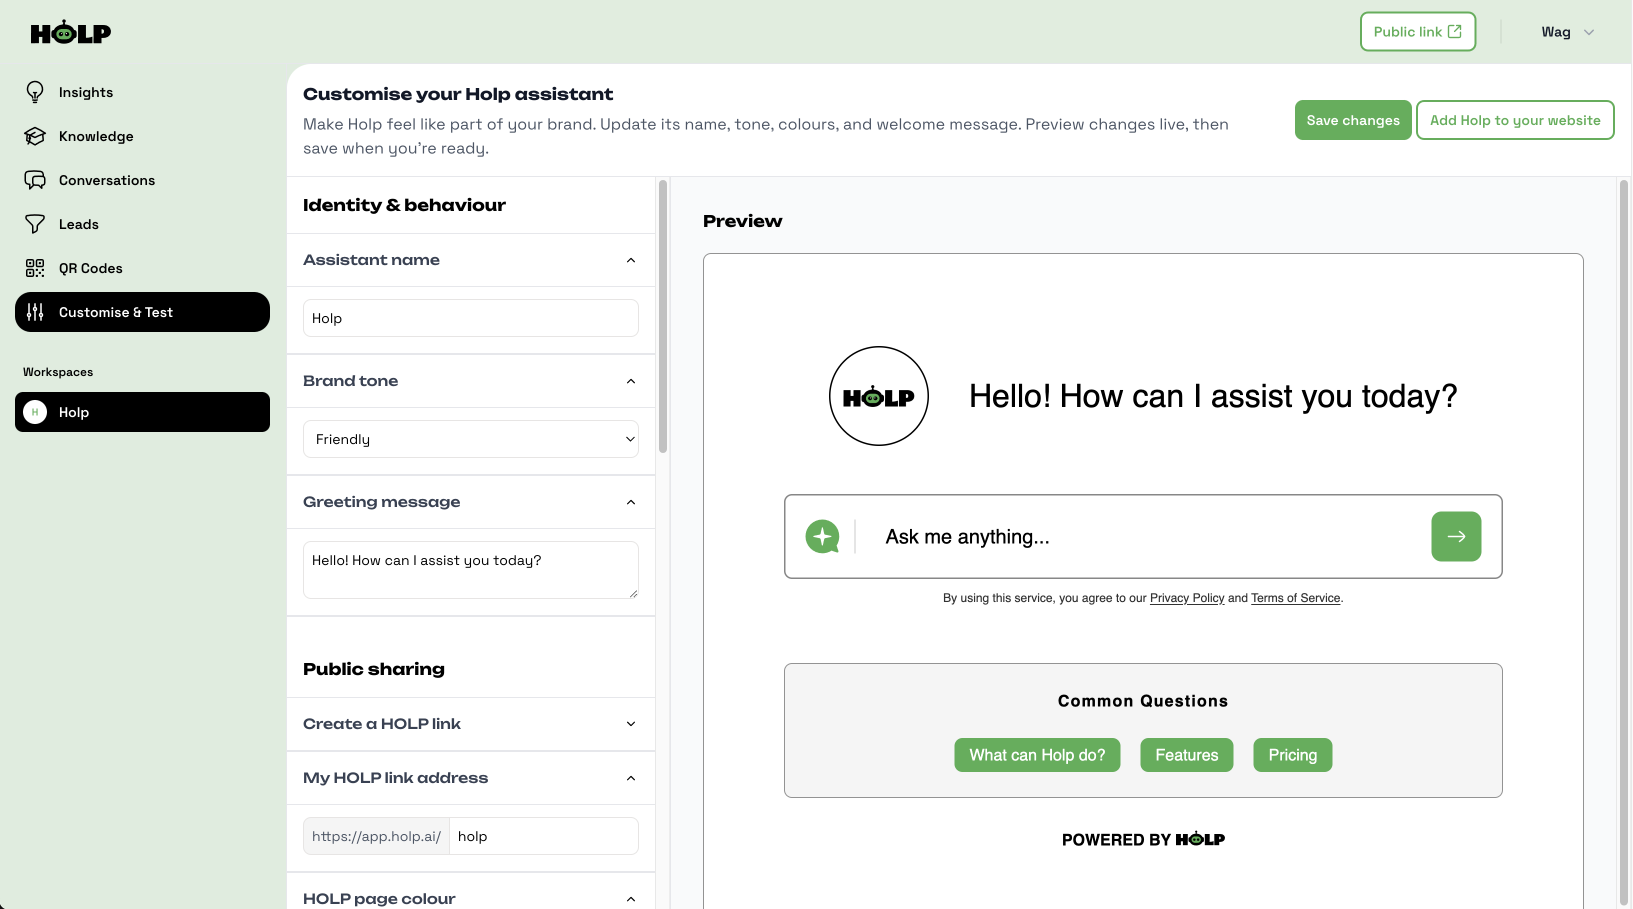
The customisation page
This is the Customisation page, where you make HOLP look, sound, and feel like part of your brand.

Preview & Test
As you make changes, the Preview area on the right updates to show how HOLP will look.
Your changes don’t go live until you click Save.
You can also test HOLP directly here by asking questions — a great way to see how your tone and greeting feel in action.
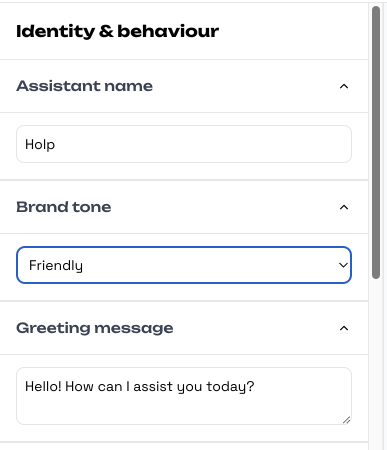
Identity & Behaviour
Start by giving your assistant its name, choosing a brand tone, and writing a greeting message.
The Assistant name is what customers will see when they chat with HOLP.
The Brand tone changes how your assistant speaks (friendly, formal, casual).
The Greeting message is your assistant’s first hello — keep it short and welcoming.


Public Sharing
You can create a public HOLP page to share directly with customers.
Enable Public access to generate your link.
Edit the link address to personalise it (e.g.
holp.ai/mybusiness).Set the HOLP page colour to match your branding.
This is your special HOLP link that can be shared anywhere to open your AI assistant. You can use it in emails, add it to your social profiles, or include it in promotional materials; the world is your oyster.
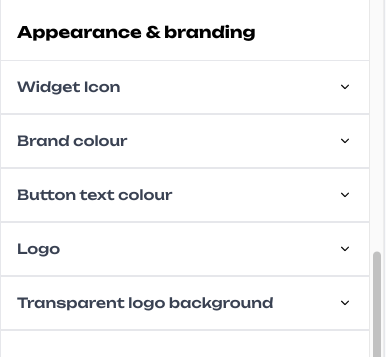
Appearance & Branding
Now customise HOLP’s look so it blends seamlessly with your site and brand. Review the preview panel as you make changes to see how it looks:
Widget icon → Choose the chat button style or keep the default one. There are five to choose from.
Brand colour → Select your main brand colour.
Button text colour → Make sure text and icons are easy to see.
Logo → Upload your business logo.
Transparent logo background → Select a colour of the background if your logo is transparent.
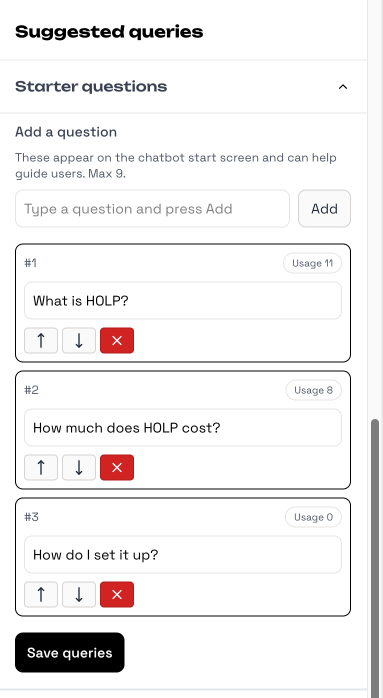
Suggested Queries
Add up to 9 starter questions. These appear in the Common Questions section underneath the chat field. They help guide people and spark interaction. For example:
What are your opening hours?
How much does it cost?
Do you offer bulk discounts?
You can add up to 9, but I suggest adding only 3-4 to avoid overwhelming people.
Make sure to click the Save queries button at the bottom once you’ve added them.
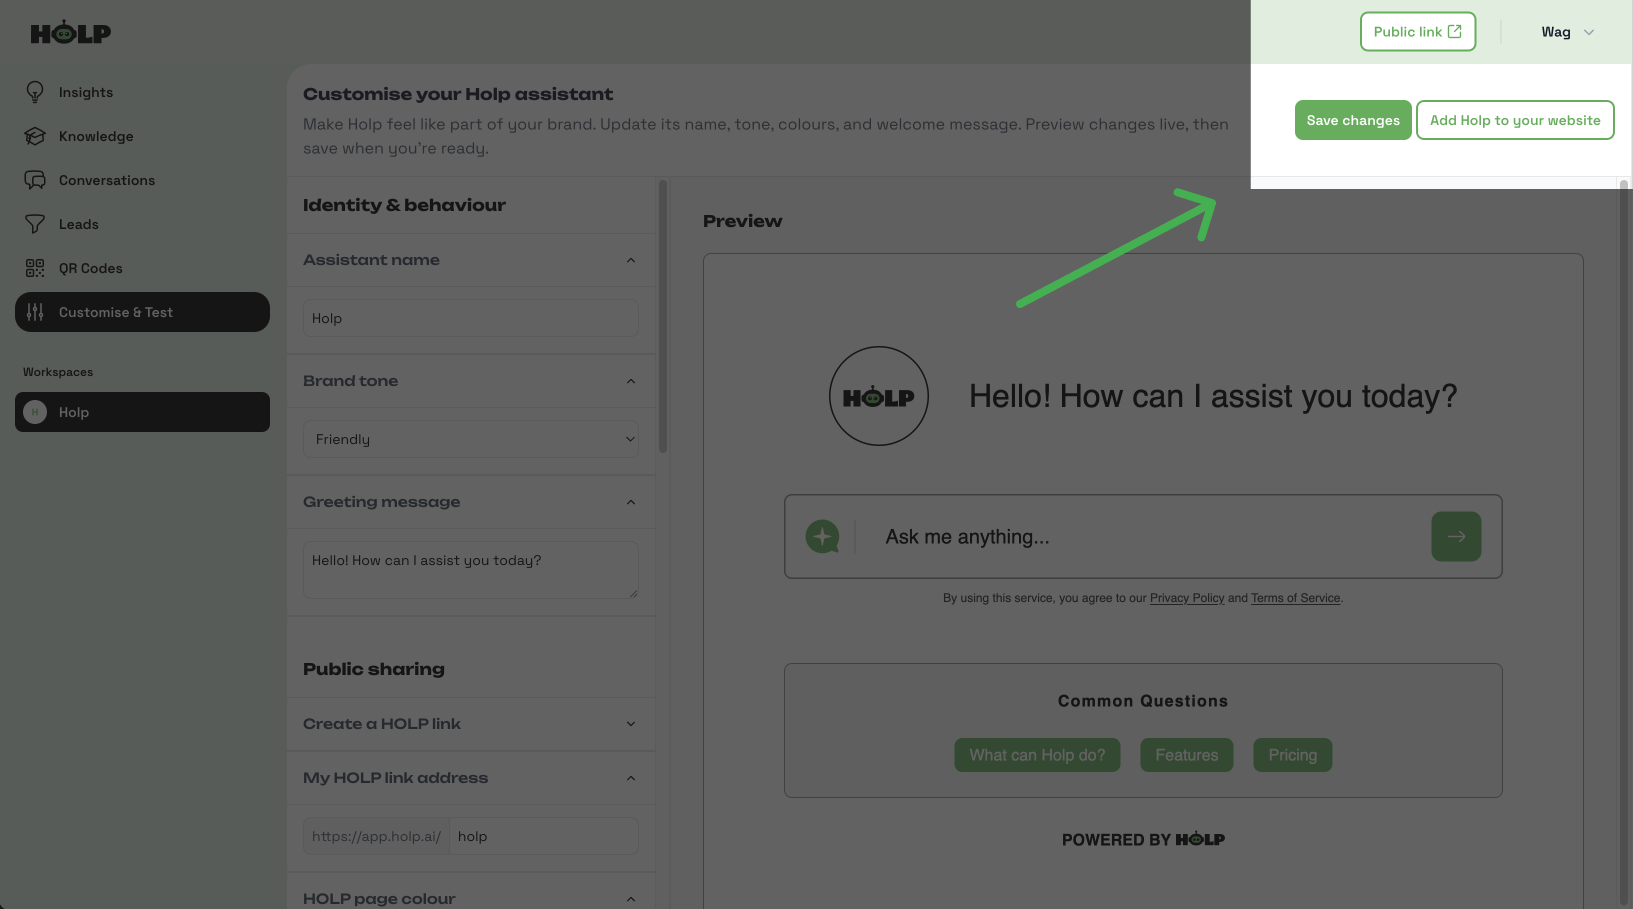
Save Your Changes
Once you’re satisfied with the identity, branding, and starter questions, click 'Save changes’. Your assistant is now customised to match your brand.
You’ll notice a Public Link button in the top right. This opens your HOLP in a browser window; this is your special HOLP Link you can share, anywhere you want.
You’ve finished customising HOLP
That’s it — you’ve now customised HOLP to reflect your brand’s identity and style. From its name and tone of voice to its colours and starter questions, your assistant is ready to meet customers in a way that feels natural and on-brand.
Next, we’ll move on to the Embedding HOLP on Your Website guide. There, you’ll learn how to take the embed code and place HOLP directly onto your site, so visitors can start chatting with your assistant right away.
👉 Remember, you don’t have to embed HOLP into a website. You can also use the Public link at the top of your dashboard.
How to Embed HOLP on Your Website or share your Holp Link
Ready to go live? This guide walks you through embedding HOLP on your website. Whether you want a floating chat widget, a search bar, or inline support, we’ll show you how to add HOLP in just a few minutes.
Now that your HOLP assistant is set up and customised, it’s time to put it live on your website. Embedding HOLP only takes a few minutes, and once it’s in place, your visitors can start chatting with it straight away.
In this guide, we’ll walk you through how to:
Find and copy your unique embed code
Choose how HOLP appears on your site (chat widget, search bar, or inline)
Add the code to your website so HOLP is live for your customers
Whether you’re comfortable with website tools or completely new to embedding code, don’t worry — we’ll keep it simple and show you exactly what to do
Save, Share, or Embed
Once you’re happy with the identity, branding, and starter questions, click Save changes. Your assistant is now customised and ready to go.
In the top-right corner you’ll see three important buttons:
Public Link → Opens your HOLP in a browser window. This is your unique link that you can share anywhere — in emails, on social media, or even as a standalone help page.
Save changes → Saves any updates you’ve made to your assistant.
Add HOLP to your website → Opens the embed options so you can place HOLP directly onto your site.
👉 Remember, you don’t have to embed HOLP into a website. You can also use the Public link at the top of your dashboard.
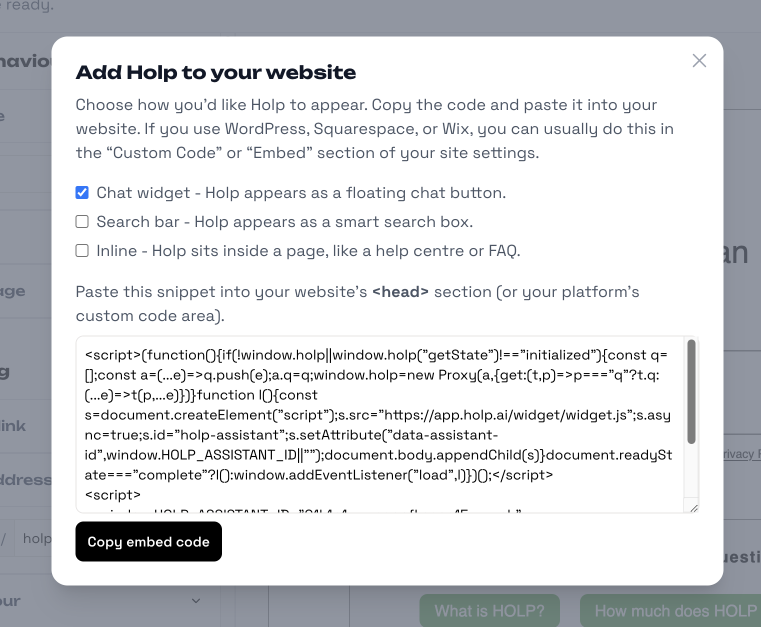
Add HOLP to your website
Click Add HOLP to your website (top right) to grab your embed code. You’ll see three placement options:
Chat widget → HOLP appears as a floating chat button (recommended).
Search bar → HOLP acts as a smart search box.
Inline → Place HOLP directly inside a page, like a help centre.
Copy the embed code and paste it into your website’s <head> section. In Squarespace, you’ll find this in the “Custom Code” area.
You should have now embedded HOLP on your website, and your visitors can start chatting with it instantly. Whether you chose the floating widget, inline option, or search bar, HOLP is ready to support your customers 24/7.
We’ll shortly be publishing platform-specific guides (for Squarespace, WordPress, Shopify, and more) to give you step-by-step instructions tailored to your setup.
💡 If you run into any problems, don’t worry — just get in touch with us and we’ll help you get everything working smoothly.
That’s the end of this guide. Next, we’ll look at how to create and use QR codes with HOLP — perfect for menus, posters, business cards, or anywhere you want people to scan and start chatting straight away.
How to Create HOLP QR CODES
Put HOLP in the real world with QR codes. In this guide, you’ll learn how to generate, customise, and share QR codes that link directly to your assistant — perfect for posters, menus, packaging, or business cards.
QR codes make it easy to share your HOLP assistant anywhere — from posters and menus to product packaging or business cards. When scanned, people are taken straight into a chat with your assistant, giving them instant answers without needing to visit your website first.
Here’s how to create and manage QR codes in HOLP:
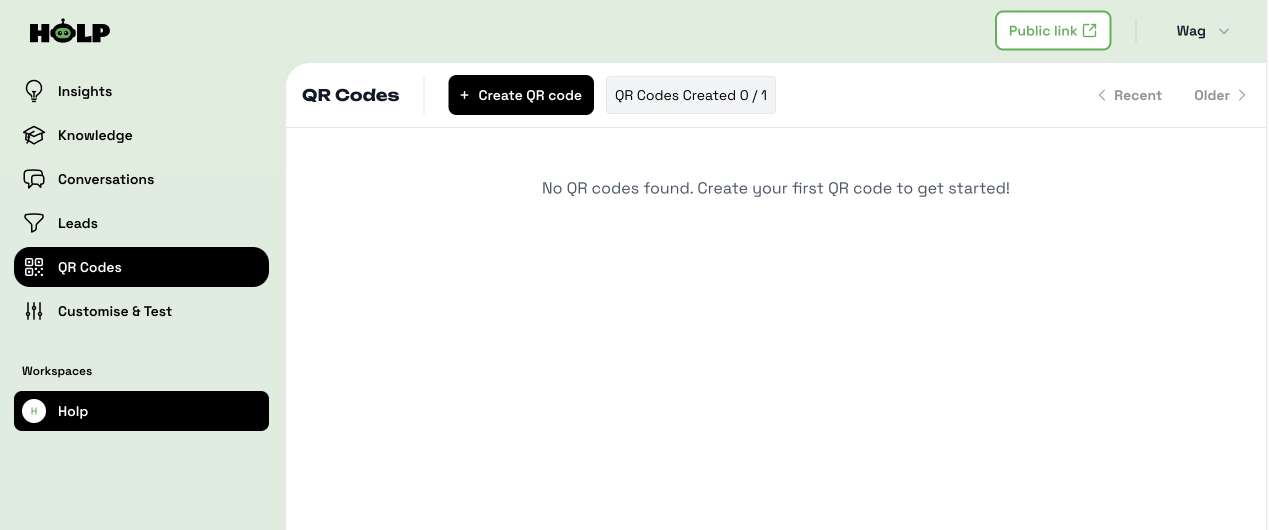
Step 1: Open the QR Code Page
In your dashboard, go to QR Codes in the left-hand menu. You’ll see the QR Code overview page.
Click + Create QR code to get started.
Step 2: Create a QR Code (Full Knowledge Base)
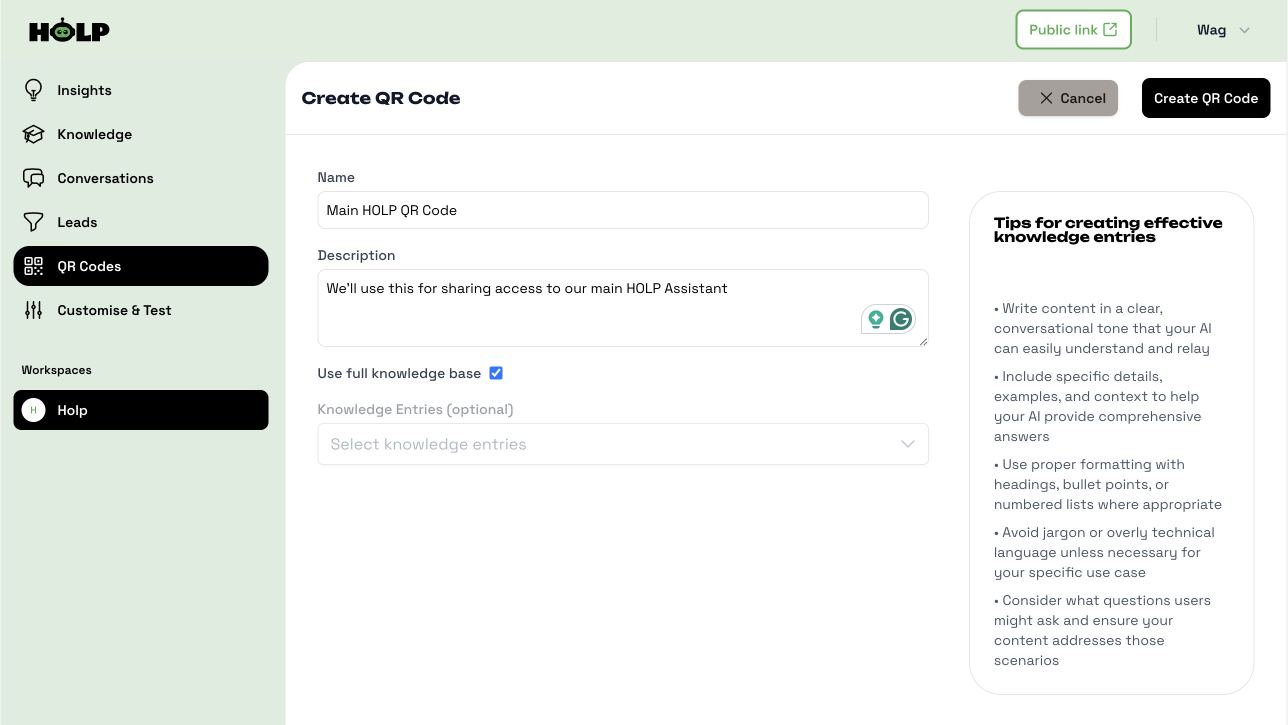
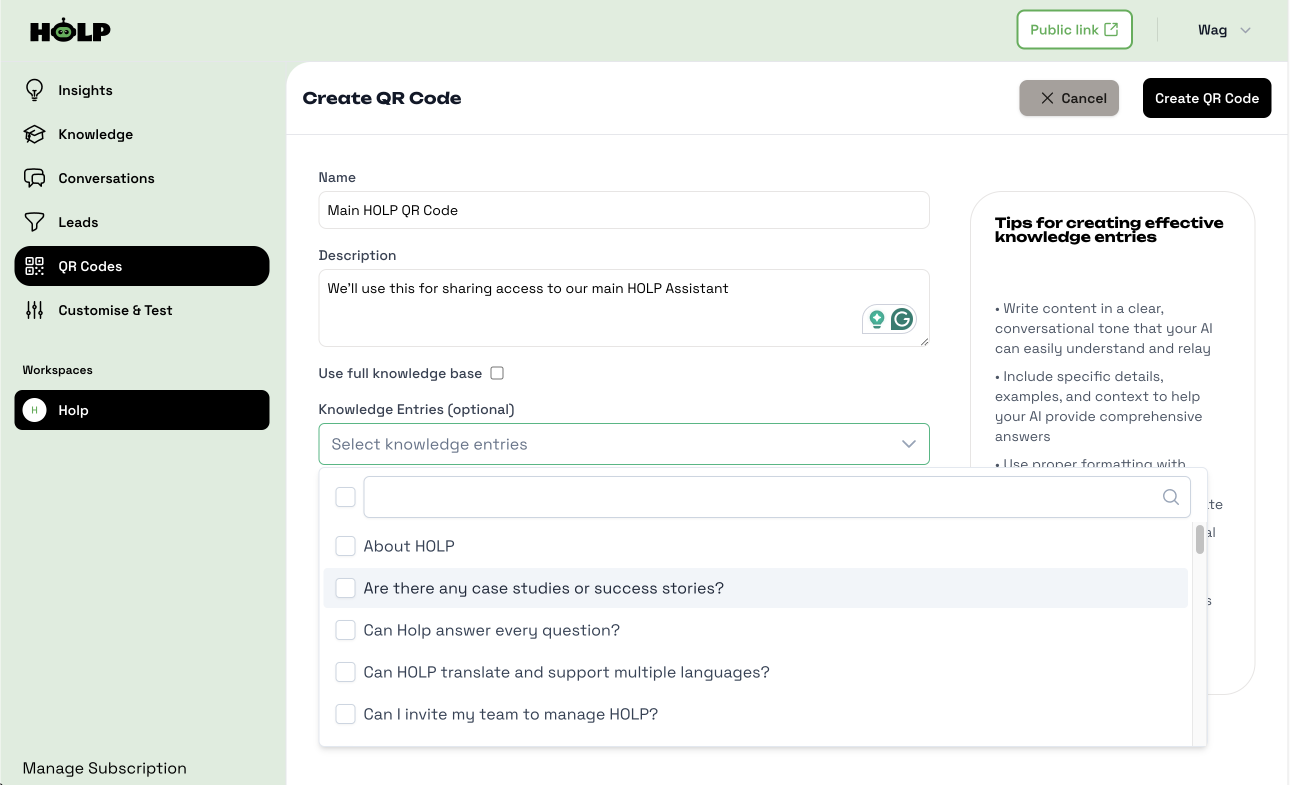
On the Create QR Code page, give your QR code a name and an optional description (this is just for your reference).
If you want the QR code to give access to your entire assistant, keep Use full knowledge base selected. This means anyone scanning the code can ask any question HOLP is trained on, not just a single topic.
This option works best when you want to give people broad access — for example:
On flyers, posters, or brochures, so anyone can explore all your services
On business cards, giving quick access to company-wide information
At events or trade shows, where people might have lots of different questions
Think of this as your “all-access” QR code — it’s like carrying your entire support team in a single scan.
Step 3: Create a QR Code (Specific Knowledge Entries)
If you want the QR code to link to something more specific, for example, a product FAQ or a single guide, uncheck “Use full knowledge base.”
You can then choose one or more specific knowledge entries from the list. This allows you to create targeted QR codes that only show information relevant to that topic.
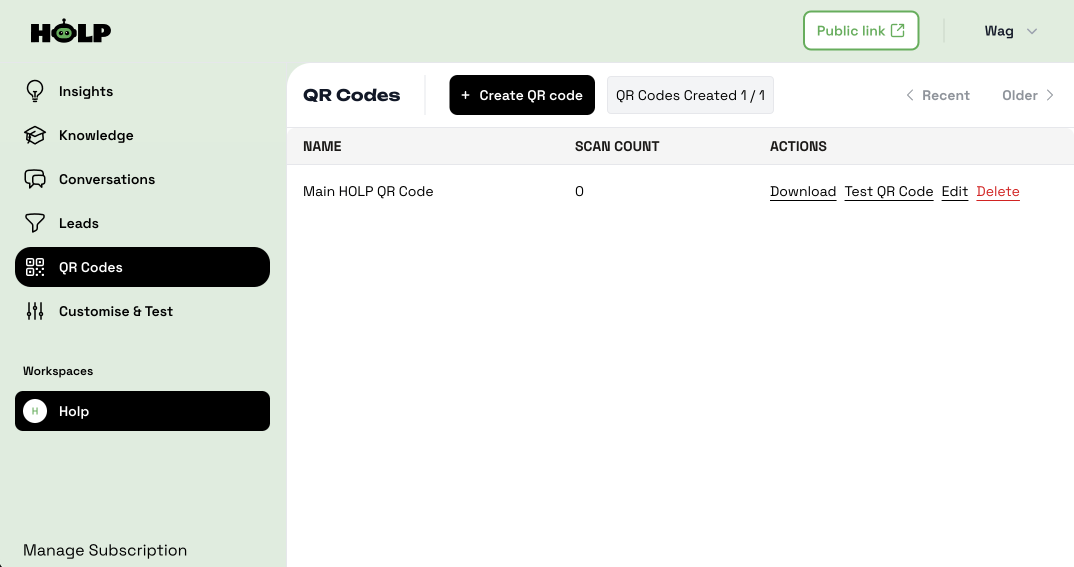
Step 4: View and Manage Your QR Codes
After creating a QR code, it will appear in your QR Code list. From here you can:
Download it to use in print or online
Test it to make sure it works correctly
Edit or Delete it at any time
The number of QR codes you can create depends on your HOLP plan.
End of QR Code Guide
That’s it! You’ve now created a QR code for your HOLP assistant. QR codes are a powerful way to connect with customers in the real world and let them access instant answers with a simple scan.
That’s the end of this guide. Next, we’ll explore the Conversations area, where you can see what customers are asking and learn how HOLP is helping them in real time.
How to Use the Conversations Area in HOLP
The Conversations area is where you see what customers are asking — and how HOLP responds. This guide explains how to review, filter, and tag chats, and how to use them to keep improving your knowledge base.
The Conversations area is where you can see every interaction between your customers and HOLP. It’s more than just a log of chats — it’s a place to:
Review conversations → See exactly what questions people are asking and how HOLP responded.
Tag and organise → Use statuses to keep track of which conversations need action, which are resolved, or which should be ignored.
Improve HOLP → Spot gaps or unclear answers, then update your knowledge base to make HOLP smarter and more accurate over time.
Together, these three activities turn the Conversations area into a continuous improvement loop — helping you understand your customers better while keeping HOLP sharp and reliable. Here’s more details.
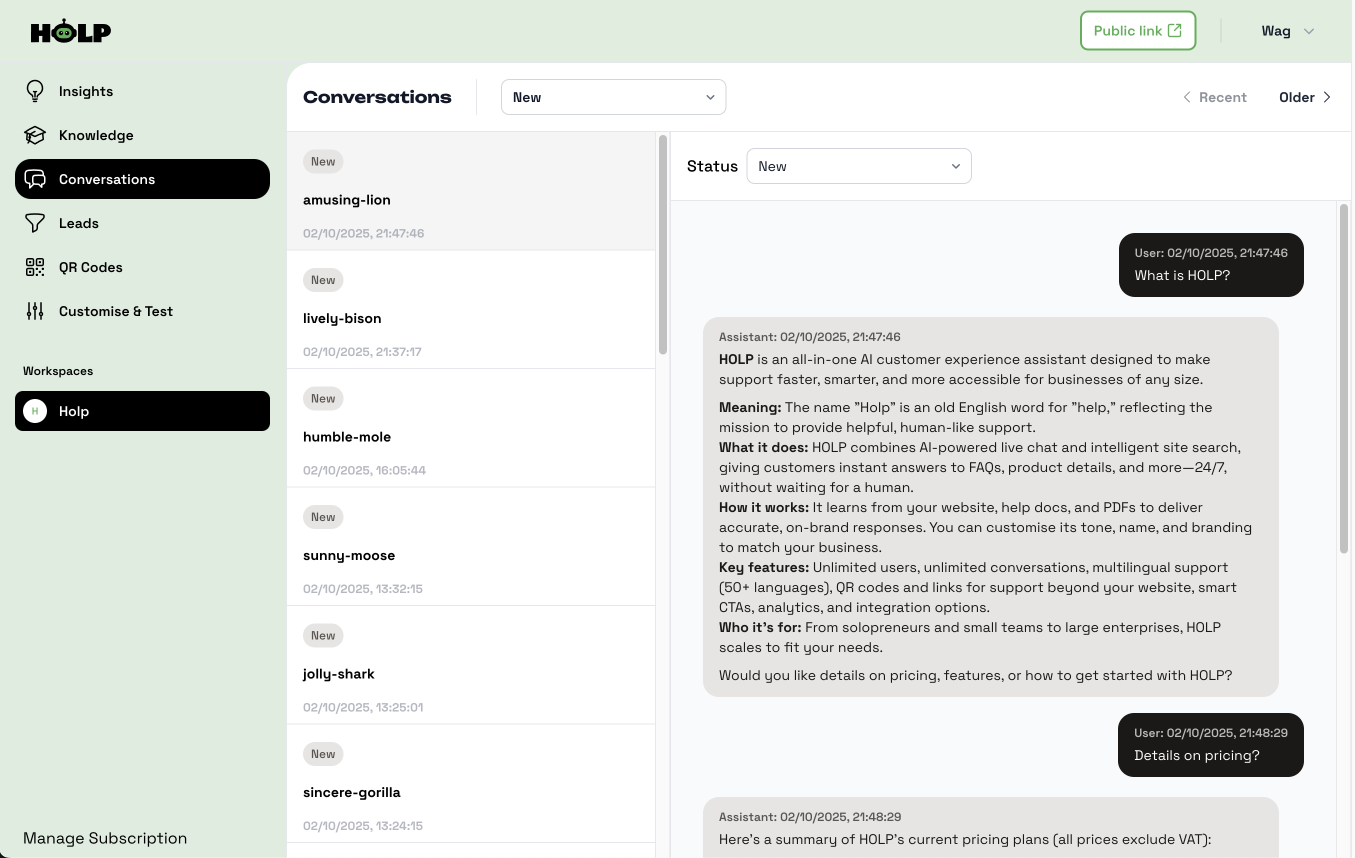
View Conversations
On the left, you’ll see a list of conversations. Each one is given a random name (like amusing-lion or sunny-moose) to keep chats anonymous while still letting you track them individually.
Click on a conversation to open it. On the right-hand side, you’ll see the full question and answer history between the user and HOLP.
Filter and Tag Conversations
At the top, you can filter conversations (e.g. by newest or oldest). Next to the Status label, you’ll see a dropdown where you can tag each conversation. The statuses include:
New
Under Review
Assigned
Awaiting Reply
Updating Knowledge Entry
Resolved
Ignored
Escalated
💡 These tags are for your internal organisation — you decide how to use them to manage and prioritise chats.
Review and Improve
The real value of the Conversations area comes from reviewing what people ask. If you notice:
A question HOLP struggled with
A missing detail in an answer
Or a new topic people are asking about
…you can head to the Knowledge section and add or update an entry. Over time, this feedback loop makes HOLP more accurate and more useful.
End of Conversations Guide
That’s it! By keeping an eye on the Conversations area and updating your knowledge base regularly, you’ll ensure HOLP keeps getting smarter and more helpful for your customers.